Crocheted Baby Cardigan

Hi folks, it’s that time again (“FINALLY”, did I hear you say?)

It’s been a busy semester at school. That doesn’t mean I’ve not been finishing (crocheted or knitted) projects, just that I haven’t gotten around to posting them quite yet. I’ve been working on a few things for the past few months, and here is the first one I am posting: a lovely, crocheted baby cardigan!

I crocheted this lovely gem for one of my good friend’s baby shower. I aimed for a 6-12 month size, somewhere in there, in hopes that it will be fall or winter for when this little cutie will be able to wear it. You never REALLY know with baby clothes. I found the pattern hereΒ for purchase, from monpetitviolon‘s etsy shop.

The design worked up wonderfully, and the sizes, in my opinion, are accurate (i.e. the 6 month-ish size fit my nephew when he was 4 months old, but fitting into 6 month clothing.)

I made it in a tan colour, because we didn’t know what sex the baby was going to be. Turns out it’s a girl and she is going to look lovely in this sweater! I can’t wait until she’s old enough to give it a try πŸ˜€

Oh, and by the way, here are some pictures for you.

DSC_0468 DSC_0467 DSC_0464 DSC_0458

I hope you enjoy! I really love the great detail in the body and the sleeves. It’s a great texture but without being too much.

Blocks and Stripes Baby Blanket

Hi Folks,

Sorry for such a delay in my postings! It’s been a busy few months. I went back to school in September, which is the biggest reason for my lengthy absence. Once the semester was over, I had to work on Christmas gifts, of course! I’d like to share one of them with you today.

I wanted to crochet my now 4 month old nephew a nice, cozy and warm blanket to keep him snug this winter. I’ve always liked the look of Moogly’s Leaping Blocks and Stripes Β Blanket, so I thought it’d be the perfect opportunity to give it a try. I stocked up on yarn at Lens Mill here in London (though really I should have purchased more than I did…I came very close to running out of yarn by the end!) I chose to do the Standard baby blanket size, and used blue, green, cream and orange for the colours. They turned out beautifully together! It took me longer than I expected to make it, however I did begin it in the middle of the semester and then put it down for a month before continuing.


I loved this pattern. Very simple to do with really only a couple pattern rows to memorize, it ultimately worked up quickly (if you don’t take into account the month that I ignored the project πŸ˜‰ ) and the yarn I chose (Bernat’s Premium yarn) is SUPER soft and a pleasure to work with. Here are some images for your enjoyment:

IMG_0734 IMG_0743 IMG_0736

For the border I simply went around in single crochet with the orange, and then again with the blue. I love how it turned out, and I’m glad I made something so soft and cuddly for my little nephew to enjoy! πŸ˜€

Crocheted Baby Elephant

Hi Everyone!

Today’s post is the result of my Facebook stalkingΒ endeavoursΒ of yesterday. I happen to have “liked” Red Heart Yarns on Facebook, and therefore get periodic posts from them. Yesterday (or maybe the day before?) they had posted this, what they called “Baby’s Elephant“. It’s a free pattern, listed as “easy”, and oh, so cute! When I saw it I thought to myself “it’s so cute, I feel obligated to make it!”

Luckily I have a nephew on the way, and so I didn’t have to search far to find a recipient of this cute little elephant toy.

As I was making it, I thought that it wasn’t too difficult. Which I figured would be the case, considering it’s an “easy” pattern. As I continued, I found it more and more of a challenging pattern. Perhaps this is due to the fact that I am left handed….so when they tell you to crochet “through the back loops only” and want the resulting ridges to be on a specific side, us lefties more or less have to do it backwards. In theory not too bad, but I’m not used to only crocheting through the front loops, so it was a slight learning curve. I also found the “finishing” directions to be a slight challenge, but I love the results they add.

I have to say, the head portion looked very strange until the ears were added! πŸ™‚

But I LOVE the result. I think it turned out beautifully, and despite the challenges (or perhaps because of) it was a rewarding experience, and I’d recommend giving it a shot if you’re thinking about it πŸ™‚

Here are some pictures!!

IMG_0397

IMG_0402

IMG_0405

IMG_0406

IMG_0407

IMG_0409


I’m debating whether I should add a small tail, as well, in order to help him sit up by himself (and, of course, because elephants have tails…)

Cozy Autumn Hat–Free Pattern

Hi Folks! Welcome back to my blog!

I’ve created another free pattern for your enjoyment. This time it’s a hat! Β I’d say it’s sized adult medium/large, but you could always make it smaller or larger.

I have never been good at identifying difficulty in a pattern, however, so I couldn’t tell you the difficulty of the pattern. It seems like maybe an “easy” level, but I’m a little biased toward it and some crocheters may find it easier, and some may find it harder! I’ll stick with “easy” for now, with a chance it may be “intermediate” (but a remote chance).

It’s always funny having a photo shoot for a product that isn’t in season quite yet (like a nice and cozy hat on a 30 degree celcius summer day). But here are some photos for you!

IMG_0371 IMG_0366 IMG_0374 IMG_0364


Materials Used:
1 skein Loops & Threads Snuggly Wuggly (shown in “Cobalt”)
4.5mm crochet hook
Tapestry needle
Stitch marker (optional)

Gauge:
Not really important for this pattern.

Abbreviations used:
DC — Double Crochet
Sl st — Slip stitch
Ch — Chain
FPDC — Front post double crochet
BPDC — Back post double crochet
St — stitch
HDC — Half double crochet

Instructions:

1) Create a Magic Ring. 12 DC into it, and then join with SL ST.
2) CH 3. FPDC and DC into each ST around (24 st).
3) CH 3. FPDC into FPDC of previous row, 2 DC into each DC around.
4) CH 3. * FPDC, DC, BPDC and DC into same st * Repeat from * around, join with SL ST to top of CH-3.
5) CH 3. * FPDC, 2 DC in ST, BPDC, DC * Repeat from * around. Join with SL ST to top of CH-3.
6) CH 3. * FPDC, DC in next 2 ST, BPDC, 2 DC in next ST * Repeat from * around. Join with SL ST to top of CH-3.
7-22) CH 3. * FPDC, DC in next 2 ST, BPDC, DC in next 2 ST * Repeat from * around. Join with SL ST to top of CH-3.
23-24) CH 2. HDC in each ST around. Join with SL ST to top of CH-2.

Fasten Off and weave in ends.

I hope that these instructions are helpful and easy to understand. Please feel free to leave any comments with questions or concerns and I will happily get back to you right away πŸ™‚


Ribbed Crocheted Wrist Warmers–Free Pattern!

Hey Folks,

This has been a few days in the making. I designed my FIRST EVER pattern from scratch recently, and I’m excited to share it for FREE on the World Wide Web. If you have found this post through searching for a free wrist warmers pattern and decide to give it a try–please let me know if you have any questions, concerns, or even corrections to add. I’d be happy to get back to you right away, and even make any corrections to the pattern. It is my first,Β after all.

Lets beginΒ with a few pictures, shall we?

IMG_0292

IMG_0293

IMG_0296

I had a difficult time finding the right lighting for pictures, so I decided to take it outside and show off my beautiful garden at the same time. πŸ™‚

Now, here is (hopefully) all the information you need for the pattern! I hope you enjoy.

For anyone who isn’t sure how to do some of the more difficult stitches, I have attached some video tutorials at the end of this post from The Crochet Crowd to help you out (both for righties and lefties!)

Materials Used:

Approximately 50g (or less) of any light worsted weight yarn

Size 4.00mm crochet hook

Tapestry needle

Stitch marker is recommended but not necessary

Gauge:

Gauge is not important for this pattern.

Abbreviations:

Ch – Chain stitch

Sl st – slip stitch

DC – Double crochet

SC – Single crochet

FPDC – Front post double crochet

BPDC – Back post double crochet

TR – Triple crochet

Sk – skip

St – Stitch

All terms used are American. Size is approximately equal to women’s size S/M. It would be easily converted to larger sizes, however, by simply adding a longer chain in the beginning and then continuing in the regular pattern. It is important to keep even numbers in the chain.

Instructions:

CH 28. Join with SL ST, being careful not to twist.
1. CH 3. DC in each ST around, also being careful not to twist.
2. CH 3. * FPDC, BPDC * Repeat from * around, join with SL ST into top of CH-3.
3-6. CH 3. FPDC into FPDC in previous row, and BPDC into BPDC of previous row. Join with SL ST into top of CH-3.
7. CH 6. SK 5 ST. FPDC into FPDC of previous row, BPDC into BPDC of previous row around. Join with SL ST into CH-1.
8. CH 3. DC into each of the remaining CH ST. * FPDC, BPDC * Repeat from * around, join with SL ST into top of CH-3.
9-22. CH 3. * FPDC, BPDC * Repeat from * around, join with SL ST to top of CH-3.
23. CH 3. 4 TR in same ST. SK 1. * 1 SC into next ST. SK 1. 5 TR into next ST. * Repeat from * around, ending with 1 SC.


Video Tutorials:

Front Post Double Crochet (FPDC) RIght Handed:

Back Post Double Crochet (BPDC) Right Handed:

BPDC for Lefties!:

FPDC for Lefties:

Ribbed Baby Hat

Hey Folks,

Continuing on the recent theme, I whipped up this quick and easy Ribbed Baby Hat. We were going through the awesomely cute clothes my sister received from her baby shower, and she realized there’s some super cute blue clothes, but super cute blue baby hats were hard to find! So, naturally, I told her I’d make her one (and I think I should make her more!!)

I did a quick search for free patterns, and came across this adorable option: the Rib-Wrapped Baby CapΒ pattern at Celtic Mommy.Β The pattern tells you how to adjust the size, based on the size of the baby. I wanted it to be as close to newborn size as possible, so I attempted that direction. It worked beautifully, except for the fact that the only blue yarn I had available was worsted weight instead of DK! To accommodate, I simply stopped increasing after round 3, and continued straight for about 7-8 times. These are the only alternations I made to this wonderful pattern, and only because my yarn was a little too heavy and I don’t have enough resources for yarn purchases, these days so I had to work with what I had!

I am very pleased with the results and thankful to CelticMommy for generously sharing this free pattern with us! I know I will use it many more times to come.

Here are some pictures for you (sorry about how dark they are):

IMG_0210

IMG_0214

IMG_0213

They are about the same size as the newborn-3 month sized hats that you can buy in the store, and it only took maybe a couple hours to whip up. Looking forward to making more of these cute hats!

Baby’s Dino Hat

Hi Folks!

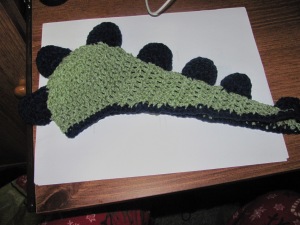
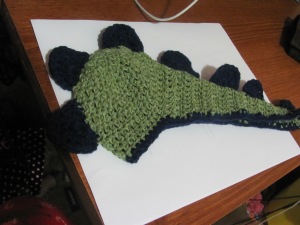
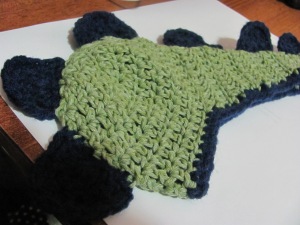
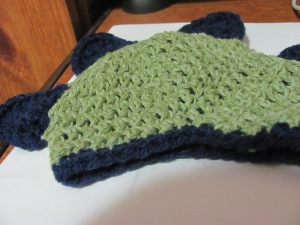
I’ve seen all these very similar “dragon” or “dino” photo props circling around the Internet lately. I’ve always thought they were super, super cute and yet didn’t know how making it for my sister would be a functional option. Then when my wonderful artist friend Gavy (check out her website here if interested to see her amazing sculptures) sent me a pin of one, I thought…why not? It’s just too cute to pass up! So I looked for a free pattern and found one within a few minutes. The pattern can be found here: Baby’s Dino Hat and Cape.

I found the pattern very straight-forward and easy to follow. I used a stitch marker in order to keep track of the rounds, as I’m notorious for messing up my count without one. Β It definitely looks like it’s newborn size, so I’m hoping (and I think my sister is, too) that he’s an average sized boy…lol. BUT if not, the pattern would very easily be modified to make it larger. No big deal, and it really didn’t take much yarn to complete. It also didn’t take very long, maybe a couple hours of work in total. Could make a great Halloween costume too!

Here are some super cute pictures of the final product for you:

IMG_0154

IMG_0158

IMG_0159

IMG_0156

So there it is. Super cute, easy and quick to make, and easily customizable. I can’t wait to see him all dressed up!

Baby Cowboy Booties

You may have seen several of my posts have a theme to them–and that is baby! We are getting ready for the arrival of my sister’s first baby, and I’ve been knitting and crocheting up a storm in preparation. Today’s entry is no different. I saw these Baby Cowboy Booties on Pinterest. At first, many of the options were paid. Since I don’t have much money coming in, I of course looked for a free option. It took a while, but with a little patience I found it for free (at the link already provided). I had a little issue understanding certain parts of the pattern, so it took me months after finding the pattern to even begin working on it. It wasn’t until I was browsing Moogly blog *I love Moogly blog!* that I found a full video tutorial of the same cowboy booties I was trying to make. I was so happy, and I knew my sister would be too when I completed making them. (She saw the Pin that I shared on Pinterest, and requested that I make them, if I can).

The pattern was relatively simple, once I got a few things figured out. I miscounted somehow and they aren’t as straight as they should be around the top, but next time I will hopefully do a little better. I used Bernat’s Handicrafter Cotton, and they were larger than I was expecting them to be–but ultimately that doesn’t matter, he’ll grow into them eventually! Now that I know the process, I can always try to make them a little smaller!

Here are some finished product pictures:

IMG_0143

IMG_0145

IMG_0148

I decided to make a star for the sides of it instead, and I think they turned out well. I also just put them on one side each to differentiate between right and left booty (not that it really matters with the pattern.) Can’t wait to see my little nephew crawling/walking around in these!

Knit Squares Baby Blanket

This entry is a little more personal, as it was created with love for my unborn nephew. My sister sent me the link to this pattern, as she was having trouble finding baby blankets she liked. She wanted something simple, without all the animal shapes and specific diagrams that are on most baby blankets nowadays. I happily agreed to knit this blanket for her, and finished it just in time for her baby shower. I didn’t have any “Cotton Twirl” yarn that the pattern calls for, so I improvised and used Bernat’s Baby Coordinates in “iced Mint” which I had bought years before and never had a use for before now. I began working the pattern as it suggests, and once I got past the first row of the pattern row, I came to realize that if I continued as per the pattern, I wasn’t going to end up with a product that looked like the picture. Maybe it was the difference in yarn, maybe it was a typo, but either way I had to improvise yet again. Thankfully, even with my brief experience as a knitter, I was able to figure it out pretty quickly. I will post the changes I made to the pattern later in this post, in case I am not the only one that encountered this issue.

Using the photos generously provided on the pattern website, I was able to construct a product that looked just like it, but had a different way of getting there πŸ™‚ It ended up being smaller than I would have liked, but I could have made it larger without any issue if I had just continued, The measurements in the end were approximately 32″x20″. Not large enough for a crib blanket (as I had planned), but the perfect size for stroller, car seat, or just dragging around the house when he’s big enough πŸ™‚

Here are some photos for you to enjoy:

IMG_0018


IMG_0019


IMG_0141


It turned out lovely, and oh-so-soft! A nice blanket for snuggles. For those who may be interested, here is the pattern as I used it:

Cast On 130 st

For 6 rows, Purl every st

First set of blocks: K5, *K12, P12*, repeat from * until last 5 st, K5

Repeat this row a total of 12 times.

Second set of blocks: K5, *P12, K12*, repeat from * until last 5 st, K5

Repeat this row a total of 12 times.

Continue in this pattern, alternating for a total of 10 block sets.

For 6 rows, purl every st. Cast off.


As you may be able to see (if you checked out the website), I didn’t alter it too much. I just thought that this was slightly simpler, and was a good way to change it for how my sister would appreciate.

Thanks for reading!! (If you’ve made it this far πŸ˜‰ )

Springtime Coasters

Time for another update.

Another piece of work I had been meaning to post is a simple one. I had my cousin’s wedding to attend in June, and needed an idea of what to make for a wedding gift. I settled on coasters–something really simple, but I figured she may appreciate being hand made. I went to Ravelry (which is often the first place I look for patterns), and quickly found the pattern for Springtime Coasters. I didn’t have the exact same yarn that was used, so I improvised and used what scrap yarn I had lying around from other projects. At first, I didn’t think the colours were going to go very well together. When I finished all six of them, they all just kind of came together and I think they work nicely.

Here are some pictures for you to enjoy:

IMG_0722

IMG_0726

IMG_0725

An issue I had, once they were all crocheted, was that they were not lying flat (which I thought was very important for a coaster…) So I considering trying to starch them to make them flat and stiff, it didn’t seem to work well, so I settled on simply ironing them on low. A simple solution, and easy enough for her to “fix” if they get bent out of shape again πŸ™‚